DIY Quail/Chicken Drinker

How to build your own automatic drinker! Automatic drinker systems are an absolute game-changer for saving time and eliminating mess. Both quail and chickens love to dust bathe and scratch around, which constantly ruins standard drinkers with dirty bedding and poop. Upgrading to automatic cups allows you to mount the waterer at the perfect height, keeping their drinking supply clean and fresh.
Another huge perk of automatic drinkers is that they can go days or even weeks between refills, depending on the size of your water reservoir. This gives you the freedom to take a short holiday without worrying about your flock running dry. For example, we use different systems customized for each of our pens. One of our setups features a 25 litre reservoir that supplies two separate pens housing 12 Coturnix quail. This single system keeps them perfectly hydrated for at least 10 days before it needs a top-up.
By following these simple steps, you can build an automatic drinker tailored perfectly to any setup style. We will include a list of links to where we find all components in the images above.
First, you need to source a water reservoir. Excellent options include a drinks dispenser (1), a water butt, or a standard plastic bucket. Whichever container you choose, make sure to drill a ventilation hole into the lid so water can flow freely down to the cups. If you decide to go with a standard bucket, you will also need to install one of the taps listed later in this blog.
Once you have chosen your water reservoir you can now gather the remaining components - air line tube, cups, fixtures and fittings. If you opt for a water dispenser like ours, you will need to start by replacing the original tap with the new tap (2), the tap listed below has a straight edge which will help keep the tubing secure. Simply push your airline tubing (3) onto the tap as far as it will go. Keeping the tubing attached to the tap allows you to sit your reservoir in place before accurately measuring the length and making cuts for your first connector. You can easily cut this flexible tubing using standard kitchen scissors. Once you have measured and cut your desired tube length you can go ahead and add a Y connector (7) or elbow connector (4) if you have a tight turn. If you need to add an elbow first, you can simply cut a small amount of tubing to join the elbow to a Y connector before continuing.
Now, before you measure and cut more tubing, it is best to set your cups in place temporarily. This makes measuring for your next cuts much easier. You can attach your cups (5) to mesh using the plastic fasteners (6), you can screw them to a piece of wood or you can cable tie them to mesh.
With your cups in place, carefully measure from 1 of the 2 Y connecter ports to the first cup and make your cut. This length of tubing should easily push onto the Y connector and the cup, you can now repeat this process with the second cup which completes your full drinker stystem!
We love keeping our setups adaptable, so we designed our watering system to be completely removable - including the cups! To do this, simply screw your drinking cups onto a sturdy piece of wood. Then mount a French cleat (8) to the back of that wood and the interlocking piece to your desired drinker location. This setup makes deep-cleaning incredibly easy, as you can lift the whole system away from the wall in a single, effortless motion.
Because our systems utilizes Y-connectors, you can expand your setup and link as many drinking cups as your flock needs. While airline tubing has plenty of flexibility, bending it too sharply will kink the line and slow/stop the water supply. Whenever you need to make a tight turn, switch out bending the tube for an elbow connector to keep the water flowing perfectly. Fixtures & Fittings
Water dispenser featured above https://amzn.eu/d/03TPQJ0t
10mm Air line tubing https://ebay.io/m/AJNJEu
10mm Elbow connectors https://ebay.io/m/y0u7d0
Auto cups https://share.temu.com/ZpnNjYIcg8B
Plastic fasteners These are supplied with the auto cups
10mm Y connectors These are supplied with the auto cups
French cleats https://share.temu.com/N0E8LhyOUtB
Below is another example of our auto drinker systems, this is setup to fit a Pets At Home Bluebell double hutch. Simply a recycled sheep lick bucket with a tap attached, 10mm air line tubing, 1 Y connector and 2 cups. Simple but highly effective!
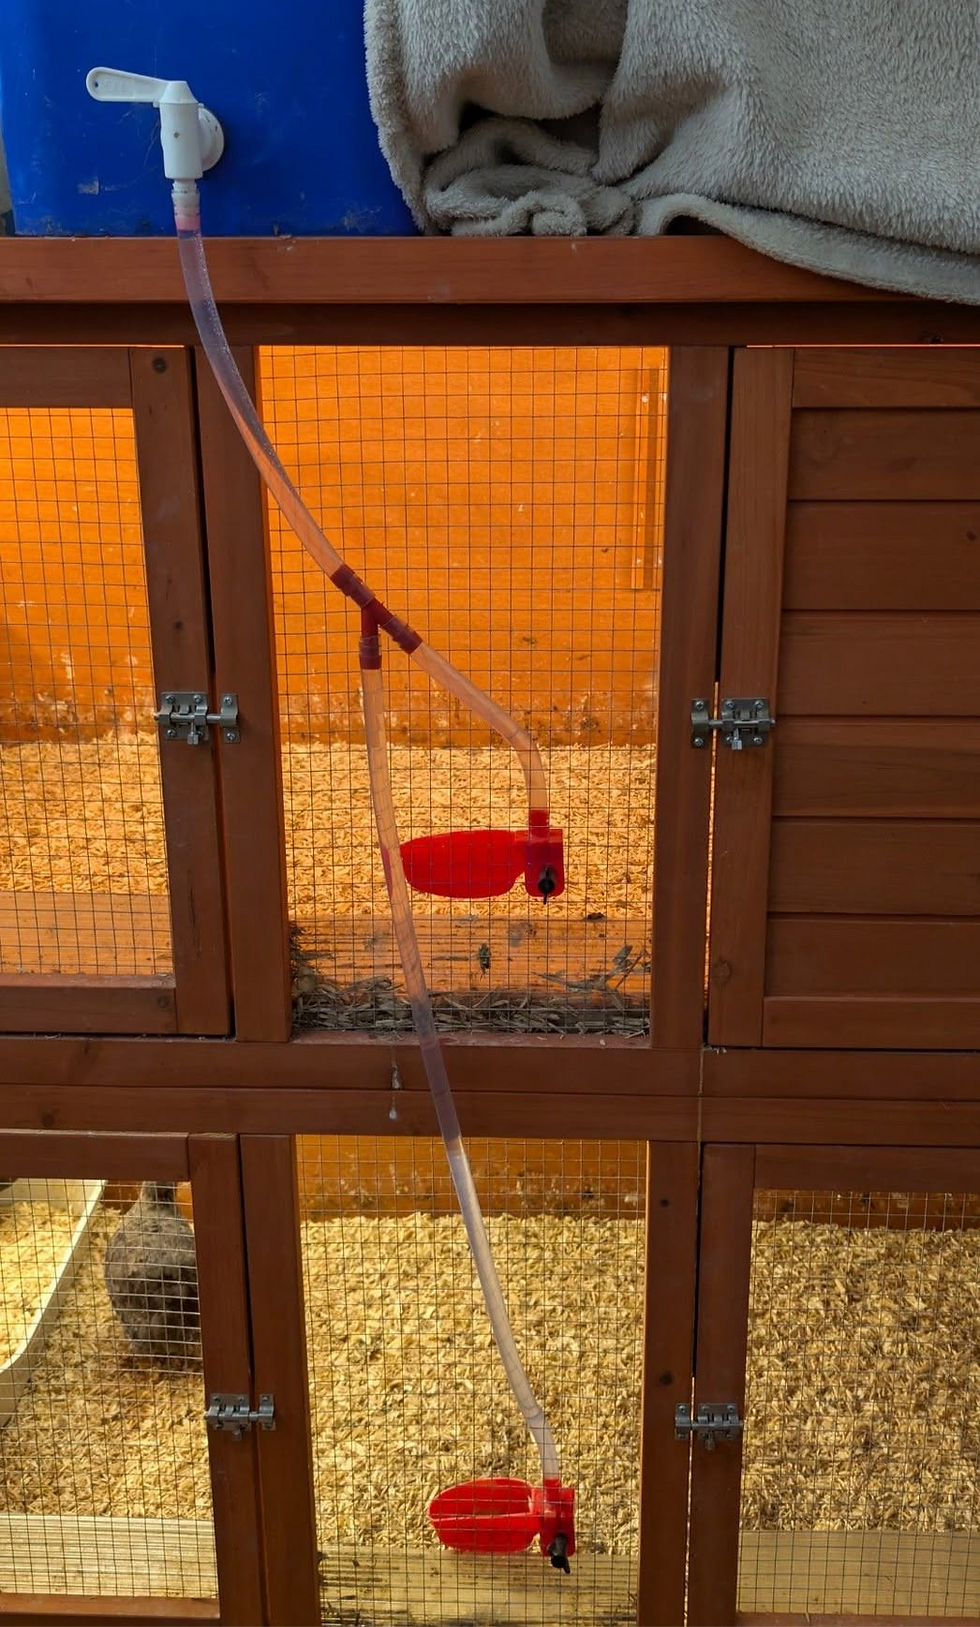
If you'd like more information or if you have any questions regarding auto drinker setups, drop us an email or contact us via our Facebook page!
Comments